카테고리 없음2025. 2. 14. 14:29

# Install Elasticsearch with Debian Package


root@KIMG-ADLOG-02:~# wget -qO - https://artifacts.elastic.co/GPG-KEY-elasticsearch | gpg --dearmor -o /usr/share/keyrings/elasticsearch-keyring.gpg
^C
gpg: signal Interrupt caught ... exiting


# 다운로드 실패로 Proxy 설정


root@KIMG-ADLOG-02:~# vi /root/.bashrc
root@KIMG-ADLOG-02:~# cat /root/.bashrc  | grep export
export http_proxy=10.7.4.237:3128
export https_proxy=10.7.4.237:3128


# 수정파일 적용
root@KIMG-ADLOG-02:~# source /root/.bashrc


# Install Elasticsearch with Debian Package
root@KIMG-ADLOG-02:~# wget -qO - https://artifacts.elastic.co/GPG-KEY-elasticsearch | gpg --dearmor -o /usr/share/keyrings/elasticsearch-keyring.gpg
File '/usr/share/keyrings/elasticsearch-keyring.gpg' exists. Overwrite? (y/N) y
root@KIMG-ADLOG-02:~#


# Installing from the APT repository

KIMG-ADLOG-02:/$
KIMG-ADLOG-02:/$ apt-get install apt-transport-https
Reading package lists... Done
Building dependency tree... Done
Reading state information... Done
The following NEW packages will be installed:
  apt-transport-https
0 upgraded, 1 newly installed, 0 to remove and 17 not upgraded.
Need to get 3,974 B of archives.
After this operation, 35.8 kB of additional disk space will be used.
Get:1 http://mirror.kakao.com/ubuntu noble/universe amd64 apt-transport-https all 2.7.14build2 [3,974 B]
Fetched 3,974 B in 0s (220 kB/s)
Selecting previously unselected package apt-transport-https.
(Reading database ... 121764 files and directories currently installed.)
Preparing to unpack .../apt-transport-https_2.7.14build2_all.deb ...
Unpacking apt-transport-https (2.7.14build2) ...
Setting up apt-transport-https (2.7.14build2) ...
Scanning processes...
Scanning linux images...

Running kernel seems to be up-to-date.

No services need to be restarted.

No containers need to be restarted.

No user sessions are running outdated binaries.

No VM guests are running outdated hypervisor (qemu) binaries on this host.
KIMG-ADLOG-02:/$


KIMG-ADLOG-02:/$ echo "deb [signed-by=/usr/share/keyrings/elasticsearch-keyring.gpg] https://artifacts.elastic.co/packages/8.x/apt stable main" |  tee /etc/apt/sources.list.d/elastic-8.x.list
deb [signed-by=/usr/share/keyrings/elasticsearch-keyring.gpg] https://artifacts.elastic.co/packages/8.x/apt stable main
KIMG-ADLOG-02:/$


KIMG-ADLOG-02:/$ apt-get update && apt-get install elasticsearch


The generated password for the elastic built-in superuser is : mDxeiY1khvY2TsSX=5uL


KIMG-ADLOG-02:/$ apt-get install kibana


KIMG-ADLOG-02:/$ ufw allow from 0.0.0.0/0 to any proto tcp port 5601 comment kibana
Rule added
KIMG-ADLOG-02:/$ ufw allow from 0.0.0.0/0 to any proto tcp port 9200 comment elasticsearch
Rule added


KIMG-ADLOG-02:/$ vi /etc/kibana/kibana.yml

# 변경전 localhost


# 변경후 0.0.0.0 


KIMG-ADLOG-02:/$ systemctl start elasticsearch.service

KIMG-ADLOG-02:/$ systemctl start kibana.service


KIMG-ADLOG-02:/$ systemctl status elasticsearch.service

KIMG-ADLOG-02:/$ systemctl status kibana.service


통신가능한 브라우저에서 kibana 포트로 접


# 토큰 발행

KIMG-ADLOG-02:/$ cd /usr/share/elasticsearch/bin/

KIMG-ADLOG-02:/usr/share/elasticsearch/bin$ ./elasticsearch-create-enrollment-token -s kibana


# 발행한 토큰 kibana에 등록


# Key 입력


# elaistsearch 설치 후 안내 되는 최초 PW 를 이용하거나. 다음 명령어 통해 패스워드 리셋 후 접속


계정명 : elastic

패스워드 : XXXXXXXXXXX


KIMG-ADLOG-02:/usr/share/kibana/bin$ cd /usr/share/elasticsearch/bin/

KIMG-ADLOG-02:/usr/share/elasticsearch/bin$ ./elasticsearch-reset-password -u elastic
This tool will reset the password of the [elastic] user to an autogenerated value.
The password will be printed in the console.
Please confirm that you would like to continue [y/N]y


Password for the [elastic] user successfully reset.
New value: B9WpZztwAhscHgBMhPh0
KIMG-ADLOG-02:/usr/share/elasticsearch/bin$


# Log in


# check - Explore on my own


# 로그인 후 화면


# 후속 작업 

# 대시보드 작업 은 Winlogbeat 설치 이후 예정


Posted by 배움나눔
2020. 2. 3. 17:11

보호되어 있는 글입니다.
내용을 보시려면 비밀번호를 입력하세요.

카테고리 없음2019. 7. 12. 17:22

iptables stop, iptables start and iptables reload fail


modpobe cpu 100%


방화벽(iptables)을 중지, 시작, 재시작시 실패 하고 modprobe 프로세스가 cpu 100% 증상일때

다음과 같이 iptables 실행 파일에서 modprobe -r 줄을 찾아 주석 처리 하고 재시작하면 정상화 된다


Centos6


Vi /etc/init.d/iptables

# 설치 제거 모듈의 줄을 찾으십시오. / modprobe -r

# 사용 #이 줄 또는이 단락을 주석으로 처리하십시오.


Centos7, Debian, Ubuntu

# 특정 환경 설치가 동일하지 않을 수도 있습니다.

즉, iptables 실행 스크립트를 찾아서 수정하십시오.

vi /usr/libexec/iptables/iptables.init

# 설치 제거 모듈의 줄을 찾으십시오.

/ modprobe -r

# 사용 #이 줄 또는이 단락을 주석으로 처리하십시오.

Posted by 배움나눔
카테고리 없음2019. 4. 12. 17:06

[출처] ELK 설치 초스피드 설치! - 10분만에 Ubuntu 로그들 모니터링하는 방법!|작성자 일선스


1. 자바 설치를 위한 레파지토리 등록

sudo add-apt-repository ppa:webupd8team/java

sudo apt-get update


2. 자바 설치

sudo apt-get install oracle-java8-installer


3. ELK 다운로드

sudo wget https://artifacts.elastic.co/downloads/elasticsearch/elasticsearch-6.7.1.deb
sudo wget https://artifacts.elastic.co/downloads/logstash/logstash-6.7.1.deb
sudo wget https://artifacts.elastic.co/downloads/kibana/kibana-6.7.1-amd64.deb

* ELK 최신 버전 확인은 아래 경로를 통해 진행해주세요

https://www.elastic.co/kr/downloads/elasticsearch

https://www.elastic.co/kr/downloads/kibana

https://www.elastic.co/kr/downloads/logstash


4. ELK 설치

sudo dpkg -i elasticsearch-6.7.1.deb
sudo dpkg -i logstash-6.7.1.deb
sudo dpkg -i kibana-6.7.1-amd64.deb


5. ELK 시작

sudo service logstash start

sudo service elasticsearch start

sudo service kibana start


Posted by 배움나눔
카테고리 없음2019. 4. 10. 12:28


Windows PowerShell
Copyright (C) Microsoft Corporation. All rights reserved.

PS C:\Users\namtop> Get-AWSPublicIpAddressRange -ServiceKey CODEBUILD | select IpPrefix
Get-AWSPublicIpAddressRange : 'Get-AWSPublicIpAddressRange' 용어가 cmdlet, 함수, 스크립트 파일 또는 실행할 수 있는 프로
그램 이름으로 인식되지 않습니다. 이름이 정확한지 확인하고 경로가 포함된 경우 경로가 올바른지 검증한 다음 다시 시도하십
시오.
위치 줄:1 문자:1
+ Get-AWSPublicIpAddressRange -ServiceKey CODEBUILD | select IpPrefix
+ ~~~~~~~~~~~~~~~~~~~~~~~~~~~
+ CategoryInfo : ObjectNotFound: (Get-AWSPublicIpAddressRange:String) [], CommandNotFoundException
+ FullyQualifiedErrorId : CommandNotFoundException


PS C:\Users\namtop> Install-Module -Name AWSPowerShell
Install-Module : 'C:\Program Files\WindowsPowerShell\Modules'에 모듈을 설치하려면 관리자 권한이 필요합니다. 관리자 권한
이 있는 계정으로 컴퓨터에 로그온한 후 다시 시도하거나 "-Scope CurrentUser"를 명령에 추가하여 'C:\Users\namtop\Documents
\WindowsPowerShell\Modules'을(를) 설치하십시오. 관리자 권한(관리자 권한으로 실행)으로 Windows PowerShell 세션을 실행해
볼 수도 있습니다.
위치 줄:1 문자:1
+ Install-Module -Name AWSPowerShell
+ ~~~~~~~~~~~~~~~~~~~~~~~~~~~~~~~~~~
+ CategoryInfo : InvalidArgument: (:) [Install-Module], ArgumentException
+ FullyQualifiedErrorId : InstallModuleNeedsCurrentUserScopeParameterForNonAdminUser,Install-Module


Windows PowerShell
Copyright (C) Microsoft Corporation. All rights reserved.

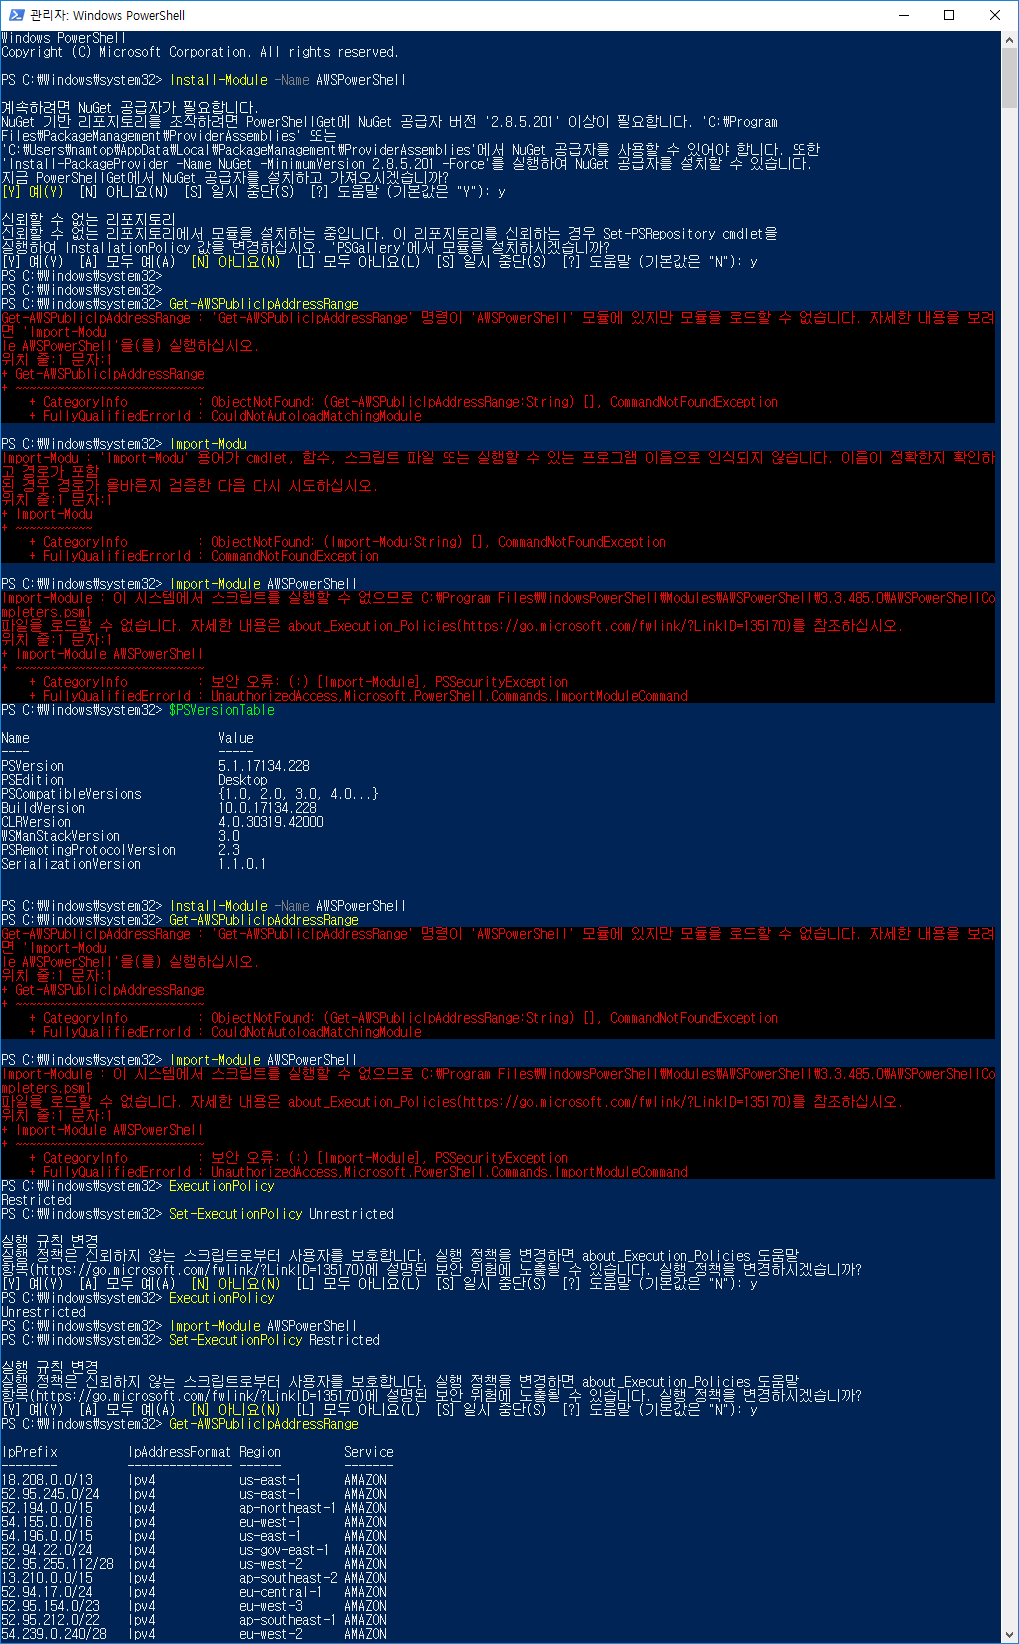
PS C:\Windows\system32> Install-Module -Name AWSPowerShell

계속하려면 NuGet 공급자가 필요합니다.
NuGet 기반 리포지토리를 조작하려면 PowerShellGet에 NuGet 공급자 버전 '2.8.5.201' 이상이 필요합니다. 'C:\Program
Files\PackageManagement\ProviderAssemblies' 또는
'C:\Users\namtop\AppData\Local\PackageManagement\ProviderAssemblies'에서 NuGet 공급자를 사용할 수 있어야 합니다. 또한
'Install-PackageProvider -Name NuGet -MinimumVersion 2.8.5.201 -Force'를 실행하여 NuGet 공급자를 설치할 수 있습니다.
지금 PowerShellGet에서 NuGet 공급자를 설치하고 가져오시겠습니까?
[Y] 예(Y) [N] 아니요(N) [S] 일시 중단(S) [?] 도움말 (기본값은 "Y"): y

신뢰할 수 없는 리포지토리
신뢰할 수 없는 리포지토리에서 모듈을 설치하는 중입니다. 이 리포지토리를 신뢰하는 경우 Set-PSRepository cmdlet을
실행하여 InstallationPolicy 값을 변경하십시오. 'PSGallery'에서 모듈을 설치하시겠습니까?
[Y] 예(Y) [A] 모두 예(A) [N] 아니요(N) [L] 모두 아니요(L) [S] 일시 중단(S) [?] 도움말 (기본값은 "N"): y
PS C:\Windows\system32>
PS C:\Windows\system32> Get-AWSPublicIpAddressRange
Get-AWSPublicIpAddressRange : 'Get-AWSPublicIpAddressRange' 명령이 'AWSPowerShell' 모듈에 있지만 모듈을 로드할 수 없습니다. 자세한 내용을 보려면 'Import-Modu
le AWSPowerShell'을(를) 실행하십시오.
위치 줄:1 문자:1
+ Get-AWSPublicIpAddressRange
+ ~~~~~~~~~~~~~~~~~~~~~~~~~~~
+ CategoryInfo : ObjectNotFound: (Get-AWSPublicIpAddressRange:String) [], CommandNotFoundException
+ FullyQualifiedErrorId : CouldNotAutoloadMatchingModule

PS C:\Windows\system32> Import-Modu
Import-Modu : 'Import-Modu' 용어가 cmdlet, 함수, 스크립트 파일 또는 실행할 수 있는 프로그램 이름으로 인식되지 않습니다. 이름이 정확한지 확인하고 경로가 포함
된 경우 경로가 올바른지 검증한 다음 다시 시도하십시오.
위치 줄:1 문자:1
+ Import-Modu
+ ~~~~~~~~~~~
+ CategoryInfo : ObjectNotFound: (Import-Modu:String) [], CommandNotFoundException
+ FullyQualifiedErrorId : CommandNotFoundException

PS C:\Windows\system32> Import-Module AWSPowerShell
Import-Module : 이 시스템에서 스크립트를 실행할 수 없으므로 C:\Program Files\WindowsPowerShell\Modules\AWSPowerShell\3.3.485.0\AWSPowerShellCompleters.psm1
파일을 로드할 수 없습니다. 자세한 내용은 about_Execution_Policies(https://go.microsoft.com/fwlink/?LinkID=135170)를 참조하십시오.
위치 줄:1 문자:1
+ Import-Module AWSPowerShell
+ ~~~~~~~~~~~~~~~~~~~~~~~~~~~
+ CategoryInfo : 보안 오류: (:) [Import-Module], PSSecurityException
+ FullyQualifiedErrorId : UnauthorizedAccess,Microsoft.PowerShell.Commands.ImportModuleCommand
PS C:\Windows\system32> $PSVersionTable

Name Value
---- -----
PSVersion 5.1.17134.228
PSEdition Desktop
PSCompatibleVersions {1.0, 2.0, 3.0, 4.0...}
BuildVersion 10.0.17134.228
CLRVersion 4.0.30319.42000
WSManStackVersion 3.0
PSRemotingProtocolVersion 2.3
SerializationVersion 1.1.0.1


PS C:\Windows\system32> Install-Module -Name AWSPowerShell
PS C:\Windows\system32> Get-AWSPublicIpAddressRange
Get-AWSPublicIpAddressRange : 'Get-AWSPublicIpAddressRange' 명령이 'AWSPowerShell' 모듈에 있지만 모듈을 로드할 수 없습니다. 자세한 내용을 보려면 'Import-Modu
le AWSPowerShell'을(를) 실행하십시오.
위치 줄:1 문자:1
+ Get-AWSPublicIpAddressRange
+ ~~~~~~~~~~~~~~~~~~~~~~~~~~~
+ CategoryInfo : ObjectNotFound: (Get-AWSPublicIpAddressRange:String) [], CommandNotFoundException
+ FullyQualifiedErrorId : CouldNotAutoloadMatchingModule

PS C:\Windows\system32> Import-Module AWSPowerShell
Import-Module : 이 시스템에서 스크립트를 실행할 수 없으므로 C:\Program Files\WindowsPowerShell\Modules\AWSPowerShell\3.3.485.0\AWSPowerShellCompleters.psm1
파일을 로드할 수 없습니다. 자세한 내용은 about_Execution_Policies(https://go.microsoft.com/fwlink/?LinkID=135170)를 참조하십시오.
위치 줄:1 문자:1
+ Import-Module AWSPowerShell
+ ~~~~~~~~~~~~~~~~~~~~~~~~~~~
+ CategoryInfo : 보안 오류: (:) [Import-Module], PSSecurityException
+ FullyQualifiedErrorId : UnauthorizedAccess,Microsoft.PowerShell.Commands.ImportModuleCommand
PS C:\Windows\system32> ExecutionPolicy
Restricted
PS C:\Windows\system32> Set-ExecutionPolicy Unrestricted

실행 규칙 변경
실행 정책은 신뢰하지 않는 스크립트로부터 사용자를 보호합니다. 실행 정책을 변경하면 about_Execution_Policies 도움말
항목(https://go.microsoft.com/fwlink/?LinkID=135170)에 설명된 보안 위험에 노출될 수 있습니다. 실행 정책을 변경하시겠습니까?
[Y] 예(Y) [A] 모두 예(A) [N] 아니요(N) [L] 모두 아니요(L) [S] 일시 중단(S) [?] 도움말 (기본값은 "N"): y
PS C:\Windows\system32> ExecutionPolicy
Unrestricted
PS C:\Windows\system32> Import-Module AWSPowerShell
PS C:\Windows\system32> Set-ExecutionPolicy Restricted

실행 규칙 변경
실행 정책은 신뢰하지 않는 스크립트로부터 사용자를 보호합니다. 실행 정책을 변경하면 about_Execution_Policies 도움말
항목(https://go.microsoft.com/fwlink/?LinkID=135170)에 설명된 보안 위험에 노출될 수 있습니다. 실행 정책을 변경하시겠습니까?
[Y] 예(Y) [A] 모두 예(A) [N] 아니요(N) [L] 모두 아니요(L) [S] 일시 중단(S) [?] 도움말 (기본값은 "N"): y
PS C:\Windows\system32> Get-AWSPublicIpAddressRange

IpPrefix IpAddressFormat Region Service
-------- --------------- ------ -------
18.208.0.0/13 Ipv4 us-east-1 AMAZON
52.95.245.0/24 Ipv4 us-east-1 AMAZON
52.194.0.0/15 Ipv4 ap-northeast-1 AMAZON


Posted by 배움나눔
Cacti2017. 9. 26. 13:22

http://blog.pages.kr/1413


Posted by 배움나눔
카테고리 없음2017. 9. 11. 21:39

출처 : http://livegs.tistory.com/43


HAproxy는 고가용성 프록시를 의미합니다. 

이름에서도 알 수 있다시피 High Availability proxy 입니다

C 언어로 작성되었으며 무료 오픈소스 프로그램입니다. 

HAproxy는 TCP / HTTP 로드 밸런서로 프록시 솔루션에 사용됩니다. 

HAproxy의 일반적인 용도는 웹서버, DB 서버 등 부하를 분산시키는 용도로 많이 사용되고 있습니다.

BSD, 리눅스, 솔라리스 등에서 사용할 수 있으며, 물론 윈도우는 안됩니다. (-0-;)

(여담이지만, 윈도우는 뭐 다 돈이네요 ;;;)


**********************************************************************************************************

* 환경

OS : Ubuntu 16.04.1 LTS

HAproxy : 1.6.7

WebServer : Apache/2.4.18 (Ubuntu)

VM : VirtualBox 5.1.2


* 참고

sudo 로 진행하지 않고 root 로 진행합니다.

**********************************************************************************************************

* 준비사항

VM 환경에서 진행되며, 로드밸런서이기 때문에

HAproxy 를 설치할 VM 하나, 웹서버 VM 2개를 먼저 준비합니다.

VM 을 만드는 부분은 여기서 설명하지 않습니다.

VM 의 상세 내역은 아래와 같습니다.


VM

OS

IP

Hostname

HAproxy

Ubuntu 16.04.1 LTS 64bit

172.16.1.5

HAproxy

 Webserver01

Ubuntu 16.04.1 LTS 64bit

172.16.1.15

webserver-01

Webserver02

Ubuntu 16.04.1 LTS 64bit

172.16.1.16

webserver-02


**********************************************************************************************************


1. Apache 설치

# apt-get install apache2 

  - 모든 VM 에 apache 를 모두 설치합니다.


2. HAproxy 저장소 등록 및 업데이트

# apt-add-repository ppa:vbernat/haproxy-1.6

# apt-get update


3. HAproxy 설치

# apt-get install haproxy


4. haproxy.cfg 수정

# vi /etc/haproxy/haproxy.cfg


global

        #log /dev/log   local0

        #log /dev/log   local1 notice

        log 127.0.0.1 local2

        chroot /var/lib/haproxy

        stats socket /run/haproxy/admin.sock mode 660 level admin

        stats timeout 30s

        user haproxy

        group haproxy

        daemon

 . . .


위처럼 log 를 주석처리 해주고 log 127.0.0.1 local2 를 입력해 줍니다.


5. rsyslog.conf 파일 수정

# vi /etc/rsyslog.conf


$ModLoad imudp

$UDPServerRun 514 


파일에 위 부분이 주석처리 되어 있다면 주석을 풀어주시고 없다면 입력해 줍니다.


6. haproxy.conf 파일 생성하고 내용 추가

# vi /etc/rsyslog.d/haproxy.conf


local2.*        /var/log/haproxy.log


7. rsyslog 서비스 재시작

# service rsyslog restart


8. haproxy.cfg 수정

# vi /etc/haproxy/haproxy.cfg


defaults

        log     global

        mode    http

        option  httplog

        option  dontlognull

        option  http-server-close

        option  forwardfor except 127.0.0.0/8

        option  redispatch

        retries 3

        timeout http-request    20

        timeout queue            86400

        timeout connect          86400

        timeout client             86400

        timeout server             86400

        timeout http-keep-alive 30

        timeout check             20

        maxconn                    50000 


frontend LB

        bind 172.16.1.5:80

        reqadd X-Forwarded-Proto:\ http

        default_backend bkLB


backend bkLB

        mode http

        stats enable

        stats hide-version

        stats uri /stats

        stats realm Haproxy\ Statistics

        stats auth haproxy:admin

        balance roundrobin

        option httpchk

        option httpclose

        option forwardfor

        cookie LB insert

        server webserver-01 172.16.1.15:80 cookie webserver-01 check

        server webserver-02 172.16.1.16:80 cookie webserver-02 check


10. HAproxy 재시작

# service haproxy restart


11. 시스템 시작시 자동으로 시작하기 위해 파일 수정

# vi /etc/default/haproxy


ENABLED=1 


12. 정상적으로 동작하는지 확인하기 위해 웹서버 index.html 를 수정

- webserver-01 에서

# mv /var/www/html/index.html /var/www/html/index.html.backup

# vi /var/www/html/index.html

webserver-01 


- webserver-02 에서

# mv /var/www/html/index.html /var/www/html/index.html.backup

# vi /var/www/html/index.html

webserver-02


13. 로드밸런싱이 되는지 확인

# curl 172.16.1.5

webserver-01

# curl 172.16.1.5

webserver-02

# curl 172.16.1.5

webserver-01

# curl 172.16.1.5

webserver-02


위 처럼 roundrobin 형식으로 정상적으로 나오는지 확인


14. HAproxy 통계 페이지 확인

- 웹브라우저에서 172.16.1.5/stats 를 입력

  로그인 화면에서 haproxy / admin 으로 로그인


* 참고

hosts 파일 수정


127.0.0.1       localhost

127.0.1.1       HAproxy


# The following lines are desirable for IPv6 capable hosts

::1     localhost ip6-localhost ip6-loopback

ff02::1 ip6-allnodes

ff02::2 ip6-allrouter


172.16.1.15  webserver-01

172.16.1.16  webserver-02 


출처: http://livegs.tistory.com/43 [if (feel)]

출처: http://livegs.tistory.com/43 [if (feel)]

Posted by 배움나눔
Windows2017. 8. 2. 21:29

C:\Users\namtop>wmic useraccount get name,sid


Name            SID
Administrator   S-1-5-21-1972438208-4015295066-470540442-500
DefaultAccount  S-1-5-21-1972438208-4015295066-470540442-503
Guest           S-1-5-21-1972438208-4015295066-470540442-501
XXXXXX          S-1-5-21-1972438208-4015295066-470540442-1001

Posted by 배움나눔
카테고리 없음2017. 6. 21. 16:50

출처 : http://monoics.tistory.com/entry/%EB%A6%AC%EB%88%85%EC%8A%A4-dpkg-%EC%97%90%EB%9F%AC-%EB%82%A0%EB%95%8C


E: Could not get lock /var/lib/dpkg/lock - open( 11 Resource  temporarily unavailable)
E: Unable  to lock  the administration directory (/var/lib/dpkg/), is another process
와 같은 메시지가 뜬다.


sudo rm -rf /var/lib/dpkg/lock 


sudo apt-get autoclean $$ apt-get clear cache
sudo reboot


or

sudo rm -rf /var/lib/apt/*

sudo apt-get update


apt-get -f install


출처: http://monoics.tistory.com/entry/리눅스-dpkg-에러-날때 [모닉스]

Posted by 배움나눔
Ubuntu2016. 6. 13. 18:58

# 스왑 off
swapoff -a

vi /etc/fstab 수정
uuid 로 잡혀 있는 스왑 경로 주석 처리
#

fdisk 를 이용하여 역순으로 메인 볼륨의 파티션 삭제

d -> 5번
d -> 2번
d -> 1번

n
p
1
2048
엔터

w 쓰고 종료

리붓

resize2fs /dev/sda1

# 스왑생성
dd if=/dev/zero of=/swapfile bs=1M count=4096


chown root:root /swapfile


chmod 600 /swapfile


mkswap /swapfile


swapon /swapfile


vi /etc/fstab

/swapfile   swap   swap   defaults  0  0


mount -a 로 확인


리붓후

swapon -a 설정확인

Posted by 배움나눔